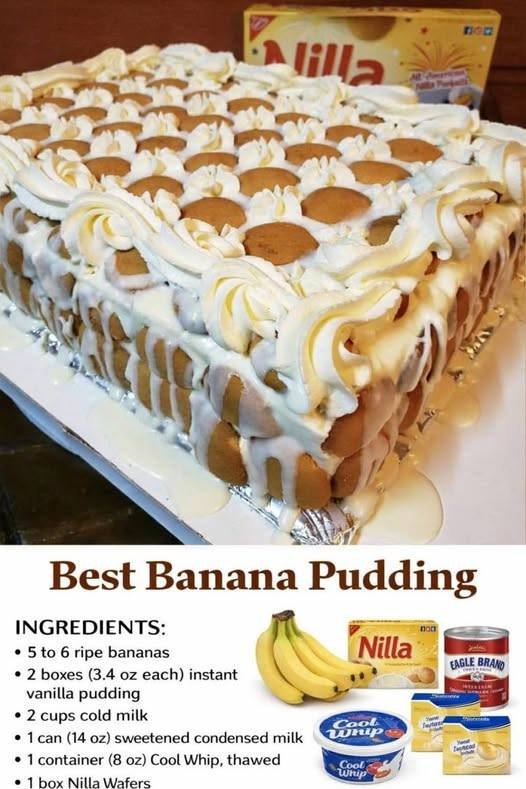
Step 1: Prepare the Pudding
In a medium bowl, whisk together the cold milk and instant vanilla pudding mix. Whisk for about 2 minutes until thickened. Set aside to fully set while you prepare the remaining components.
Step 2: Make the Creamy Base
In a separate large bowl, beat the softened cream cheese until smooth and free of lumps. Slowly add the sweetened condensed milk, mixing until fully combined and silky.
Gently fold the prepared pudding into the cream cheese mixture until smooth and uniform.
Step 3: Fold in the Whipped Topping
Carefully fold the whipped topping into the pudding mixture using a spatula. Mix just until incorporated to keep the texture light and fluffy.
Step 4: Assemble the Layers
In a large trifle dish or 9×13-inch serving dish, create a layer of vanilla wafers on the bottom. Add a layer of sliced bananas over the wafers, followed by a generous layer of the pudding mixture.
Repeat the layers until all ingredients are used, finishing with a layer of pudding on top. Garnish with crushed wafers or banana slices if desired.
Step 5: Chill
Cover the dish and refrigerate for at least 4 hours, preferably overnight. This allows the flavors to meld and the wafers to soften to the perfect cake-like texture.
Serving and Storage:
Banana pudding is best served chilled. Scoop into bowls or serve directly from the dish for a rustic, comforting presentation.
Store leftovers covered in the refrigerator for up to 3 days. Keep in mind that bananas will soften over time, so this dessert is best enjoyed within the first 48 hours.
Tips:
Use ripe bananas with minimal brown spots for the best flavor.
Let the pudding chill overnight for the best texture.
Layer evenly to ensure every bite has wafers, bananas, and cream.
For extra flavor, add a splash of vanilla extract to the pudding mixture.
Top with extra crushed wafers just before serving for added crunch.
Conclusion:
This banana pudding recipe is the definition of a timeless classic done right. Creamy, rich, and perfectly layered, it brings together simple ingredients to create something truly special.
Whether you’re serving it for a celebration or making it just because, this dessert never disappoints. It’s comforting, indulgent, and unforgettable—the kind of recipe that gets passed down and requested again and again.
Don’t lose this recipe. Save it, share it, and enjoy every delicious spoonful.
FAQ:
Can I make banana pudding ahead of time?
Yes. In fact, making it ahead allows the flavors to develop and improves the texture.
Can I use homemade whipped cream instead of whipped topping?
Absolutely. Use stabilized whipped cream for best results.
How do I keep bananas from turning brown?
Layer bananas between pudding and wafers to reduce air exposure, and serve within two days.
Can I freeze banana pudding?
Freezing is not recommended, as it affects texture once thawed.
Can I use a different type of cookie?
Vanilla wafers are traditional, but butter cookies or shortbread can be used as alternatives.