Baking Method: Step-by-Step Cake Preparation
Preparation (Preheat & Pan):
Preheat your oven to $175^\circ\text{C}$ ($350^\circ\text{F}$).
Grease a 9×5 inch loaf pan and line it with a sling of parchment paper, ensuring the paper hangs over the long sides for easy lifting. This is a crucial step for a beautiful, intact loaf.
Combine Dry Ingredients:
In a medium bowl, whisk together the flour, cocoa powder, baking soda, and salt. Whisking ensures everything is evenly distributed. Set aside.
Cream Butter and Sugar:
In a large mixing bowl (or the bowl of your stand mixer), beat the softened butter and granulated sugar together on medium speed until the mixture is light and fluffy (about 3-4 minutes). This creaming process incorporates air, which is vital for the cake’s structure and lift.
Add Wet Ingredients (Emulsification):
Beat in the eggs one at a time, mixing well after each addition. Scrape down the sides of the bowl.
Stir in the vanilla extract.
Alternate Wet and Dry:
Reduce the mixer speed to low. Add one-third of the dry ingredients to the butter mixture and mix briefly.
Pour in half of the buttermilk and mix briefly again.
Repeat, alternating until all the dry ingredients and buttermilk are just combined. DO NOT OVERMIX. Stop as soon as you no longer see streaks of flour.
Bloom the Cocoa (The Secret Step):
In a separate small, heat-safe bowl, pour the boiling water or hot coffee over the batter, stirring gently but quickly until smooth. The thin batter is correct; the hot liquid “blooms” the cocoa, intensifying the chocolate flavor dramatically.
Gently fold in the chocolate chips/chunks using a rubber spatula.
Bake:
Pour the batter into the prepared loaf pan and smooth the top.
Bake for 55-65 minutes. The cake is done when a toothpick inserted into the center comes out with only a few moist crumbs attached, or clean. The baking time may vary based on your oven.
Cool:
Let the cake cool in the pan for 15-20 minutes.
Use the parchment paper sling to lift the cake out of the pan and transfer it to a wire cooling rack to cool completely before glazing.
Page 2: Crafting the Ganache Glaze and Mastering the Finish
🍫 The Art of the Rich Ganache Glaze
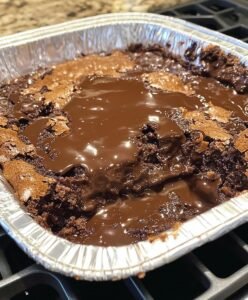
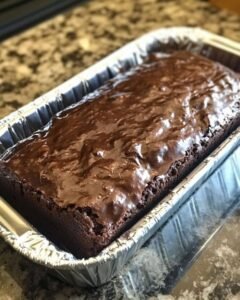
The glossy, crackled topping in the photo is the perfect touch for a rich chocolate loaf. While you can opt for a simple powdered sugar glaze, a true chocolate ganache offers unparalleled flavor and aesthetic appeal.
Ganache Method: Simple and Silky
Prepare the Chocolate: Finely chop the dark chocolate and place it in a heat-proof bowl. Finer chopping leads to faster, smoother melting.
Heat the Cream: Pour the heavy cream into a small saucepan. Heat over medium heat until it just begins to simmer—small bubbles will form around the edge of the pan. Do not let it boil vigorously.
Pour and Rest: Remove the cream from the heat and immediately pour the hot cream over the chopped chocolate.
Be Patient: Let the mixture sit, undisturbed, for 5 minutes. This allows the heat of the cream to melt the chocolate chips evenly.
Stir for Gloss: After 5 minutes, begin stirring gently from the center of the bowl with a whisk or rubber spatula. Gradually work your way outwards. Continue stirring until the mixture is completely smooth and glossy.
Add Butter (Optional): If using, stir in the tablespoon of softened butter. This is an optional pro tip that adds extra shine (as seen in the image) and a slightly richer mouthfeel.
Glaze Consistency: Let the ganache cool for about 5-10 minutes, stirring occasionally, until it is thick enough to pour smoothly but still holds its shape when drizzled (like thick honey).
Finishing the Loaf Cake
Ensure Cooling: This is critical! The cake must be completely cool before applying the ganache. If the cake is warm, the ganache will melt, run right off the sides, and soak into the cake, creating a thin, dull mess.
Position the Cake: Place the fully cooled cake (still on the wire rack) over a sheet of parchment paper or a baking tray. This catches any drips, making cleanup easy.
Pour and Spread: Slowly pour the warm (but slightly thickened) ganache over the center of the loaf. Use an offset spatula or the back of a spoon to gently spread it, encouraging it to naturally drip down the sides for that signature, rustic look.
Set the Glaze: Allow the ganache to set at room temperature for about 30 minutes, or speed up the process by placing the glazed cake in the refrigerator for 15 minutes. Once set, slice and serve.
💡 Expert Baking Tips and Troubleshooting
Problem Potential Cause Pro Solution
Dry Cake Too much flour; over-mixing; over-baking. Measure flour carefully (spoon and level); mix only until combined; check doneness 5 minutes early.
Cake Sinks in Middle Oven door opened too early; not baked through; ingredients too cold. Use room temperature ingredients; do not open the oven door before the 45-minute mark.
Ganache is Greasy/Separated Cream was too hot; over-stirring the cream and chocolate mixture. Start over; ensure cream only simmers, does not boil; stir gently and slowly until emulsified.
Tunnels or Large Holes in Cake Over-mixing the batter. Mix only until the dry ingredients are just incorporated. Lumps are better than over-mixing!
Page 3: SEO Optimization, Variations, and Serving Suggestions
📈 Maximizing Flavor and SEO
For a recipe to be successful online, it needs to be detailed, informative, and contain the right language to reach the target audience—in this case, home bakers looking for the best double chocolate loaf cake.
The Power of Ingredient Temperature
Baking is a science, and temperature is one of the most important variables. Room temperature ingredients (butter, eggs, buttermilk) are essential for two main reasons:
Emulsification: Room temperature ingredients mix together seamlessly, creating a stable, smooth batter that holds air. Cold ingredients result in a lumpy, separated batter that will yield a dense cake.
Volume: Room temperature butter creams with sugar more effectively, creating tiny air pockets. When heated, these air pockets expand, giving the cake a light, fluffy texture.
Why Use Hot Coffee? (Blooming the Cocoa)
Using hot liquid is the key to maximizing the chocolate flavor. The heat activates the cocoa solids, dissolving them and releasing their full, deep color and flavor profile. Coffee is often used because it has a subtle bitterness that doesn’t make the cake taste like coffee, but instead amplifies and deepens the richness of the chocolate. If you prefer not to use coffee, use plain boiling water.
🔄 Recipe Variations for a Unique Loaf
Mocha Loaf Cake: Increase the instant espresso/coffee powder in the hot liquid to 2 teaspoons for a stronger coffee flavor.
Raspberry Chocolate Loaf: Fold $1/2$ cup of fresh or frozen raspberries (do not thaw) into the batter just before pouring it into the pan.
Nutty Chocolate Loaf: Fold in $1/2$ cup of toasted and chopped pecans, walnuts, or hazelnuts along with the chocolate chips.
Orange Chocolate Loaf: Add the zest of one large orange to the butter and sugar mixture for a classic flavor pairing.
🍽️ Serving and Storage Guidelines
Serving Suggestions
This rich loaf cake is best served at room temperature.
Simple Elegance: Serve a slice with a dusting of extra cocoa powder and a cup of strong coffee or a glass of cold milk.
Dessert Style: Warm a slice gently in the microwave (about 10-15 seconds) and serve with a scoop of premium vanilla bean ice cream or a dollop of fresh whipped cream.
Seasonal Touch: Garnish with fresh berries (like raspberries or strawberries) during spring and summer, or sprinkle with powdered sugar and sea salt flakes in the winter.
Storage
Room Temperature: Store the fully cooled and glazed cake in an airtight container at room temperature for up to 3-4 days.
Freezing: For long-term storage, cool the unglazed cake completely. Wrap it tightly in plastic wrap, then a layer of aluminum foil, and freeze for up to 3 months. Thaw overnight in the refrigerator, then glaze before serving.
🌟 Conclusion: Your New Go-To Chocolate Recipe
This Decadent Double Chocolate Loaf Cake recipe combines the rich depth of a brownie with the moist, tender crumb of a perfect cake. With the addition of the silky, professional-quality ganache glaze, this treat is guaranteed to become a household favorite. Follow these detailed steps and tips, and you will bake a spectacular loaf that looks just as perfect as the one in the photo!